

Voice mode
Section titled “Voice mode”Talk with the agent out loud, and hear it answer in real time. With Antigravity voice mode, powered by the Gemini Live model, you speak to Antigravity the way you’d talk to a teammate on a call: give it a task, steer the work while it runs, and answer permission prompts without clicking.
Antigravity App
Section titled “Antigravity App”Voice mode in the Antigravity App: ask for a fix out loud, let the agent work, and hear the result. Turn on sound to hear both voices.
Antigravity CLI
Section titled “Antigravity CLI”Voice mode in the Antigravity CLI: start it with /voice live, ask for a fix out loud, and hear the result. Turn on sound to hear both voices.
Voice mode is available in the Antigravity CLI version 1.5.0 and later.
Overview
Section titled “Overview”Voice mode turns a conversation into a spoken, two-way conversation with the agent. While you talk, the agent does the work in the conversation, so you can read along:
- Speak naturally: give tasks, ask questions, or think through a problem out loud, the same way you’d type a prompt. Voice mode continues the conversation that you’re in, so the agent has the context of earlier messages, including the ones you typed.
- Steer while it works: add details, correct course, or stop a task without waiting for it to finish.
- Answer by voice: allow or deny permission prompts and answer the agent’s questions out loud.
- Choose what you hear: the agent works quietly by default. Ask for spoken progress updates when you want them.
- Read along: everything the agent writes, edits, or draws appears in the conversation as usual, and you can follow what you and the agent say while you talk.
Voice mode and voice dictation
Section titled “Voice mode and voice dictation”Antigravity App
Section titled “Antigravity App”The Antigravity App has two ways to use your voice:
| Voice mode | Voice dictation | |
|---|---|---|
| What it does | Holds a spoken conversation with the agent. | Types what you say into the message box. |
| How to start | Click Start Voice mode in the message box. | Click the microphone in the message box, or press Ctrl+M. |
| How the agent answers | Out loud, while its work appears in the conversation. | In writing, after you send the message. |
| When to use it | You want to work hands-free, or talk a task through while the agent works. | You want to review and edit a prompt before you send it. |
To learn more about dictation, see Voice transcription.
Antigravity CLI
Section titled “Antigravity CLI”The Antigravity CLI has two ways to use your voice:
| Voice mode | Voice dictation | |
|---|---|---|
| What it does | Holds a spoken conversation with the agent. | Types what you say into the prompt box. |
| How to start | Run /voice live, or press F6. | Run /voice dictate or /record, or press F5. |
| How the agent answers | Out loud, while its work appears in the conversation. | In writing, after you send the prompt. |
To learn more about dictation, see Voice dictation in the CLI.
Start voice mode
Section titled “Start voice mode”Antigravity App
Section titled “Antigravity App”You can start voice mode in a new conversation or in an existing one. In an existing conversation, voice mode continues that conversation by voice.
To start voice mode, do the following:
-
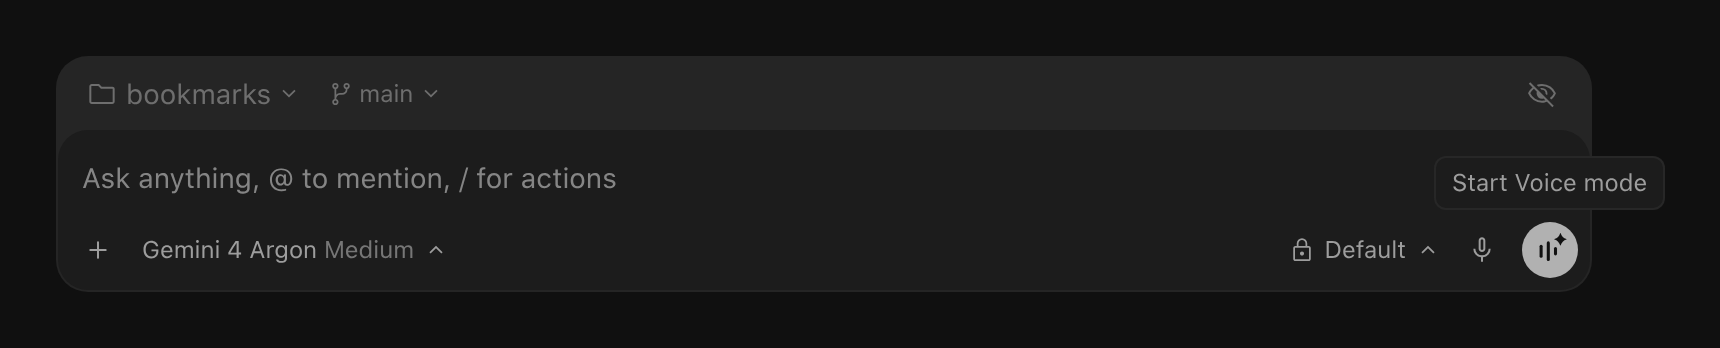
With the message box empty, click Start Voice mode. It’s the round button with sound bars next to the dictation microphone, and it appears only while the message box is empty. When the agent is idle, it appears in place of Send. While the agent is working, it appears next to the button that stops the agent.
-
If the Antigravity App asks for access to your microphone, allow it.
-
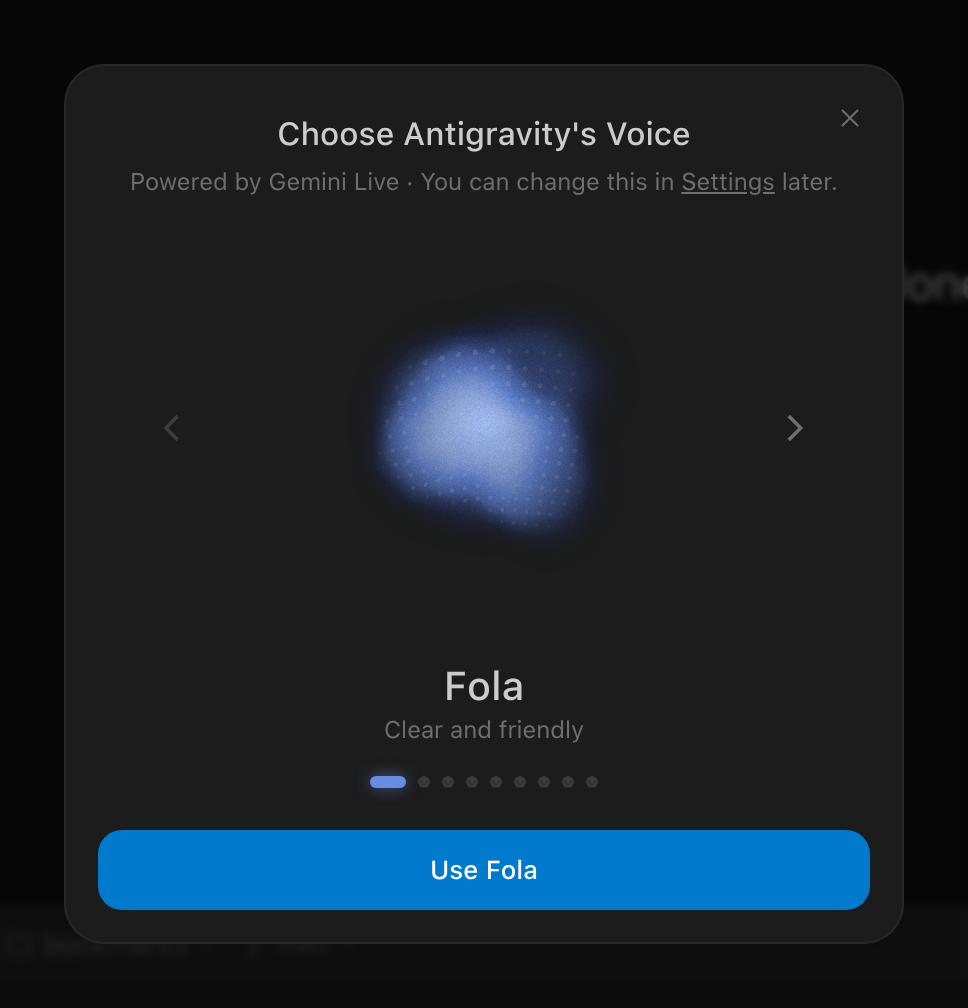
The first time you start voice mode, the Choose Antigravity’s Voice dialog opens and plays a sample of a voice. To hear other voices, click the arrows or press ← and →. To choose the voice that’s playing, click the Use button, which shows the voice’s name, or press Enter.
-
Start talking.
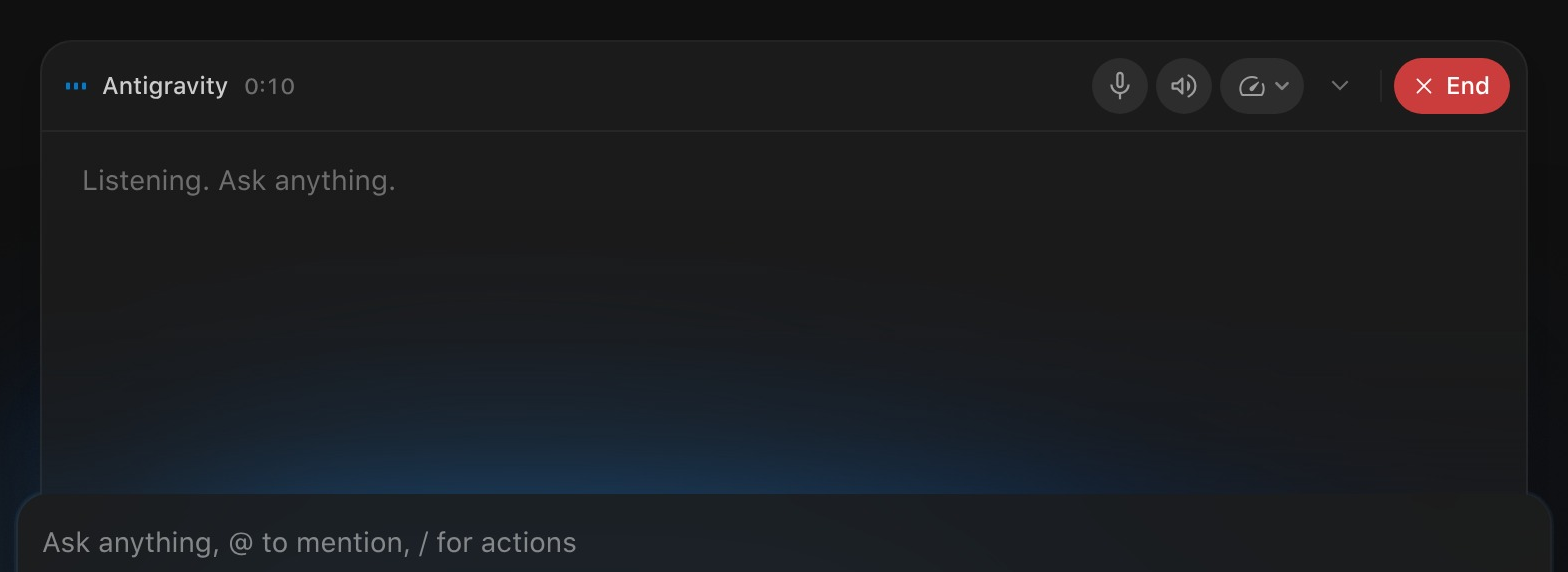
When you start voice mode, a panel rises above the message box and shows Connecting… while voice mode connects. When it’s ready, a chime plays. The call bar at the top of the panel shows whose turn it is and how long voice mode has been on, followed by the controls. Until you speak, the panel shows Listening. Ask anything. The conversation also shows a Started voice chat marker with the time.
Antigravity CLI
Section titled “Antigravity CLI”You can start voice mode in a new conversation or in an existing one. In an existing conversation, voice mode continues that conversation by voice.
To start voice mode, run /voice live, or press F6. The CLI needs a
microphone and a speaker. In an SSH session, run agy mic-serve on your own
computer and set ANTIGRAVITY_MIC, as for
voice dictation.
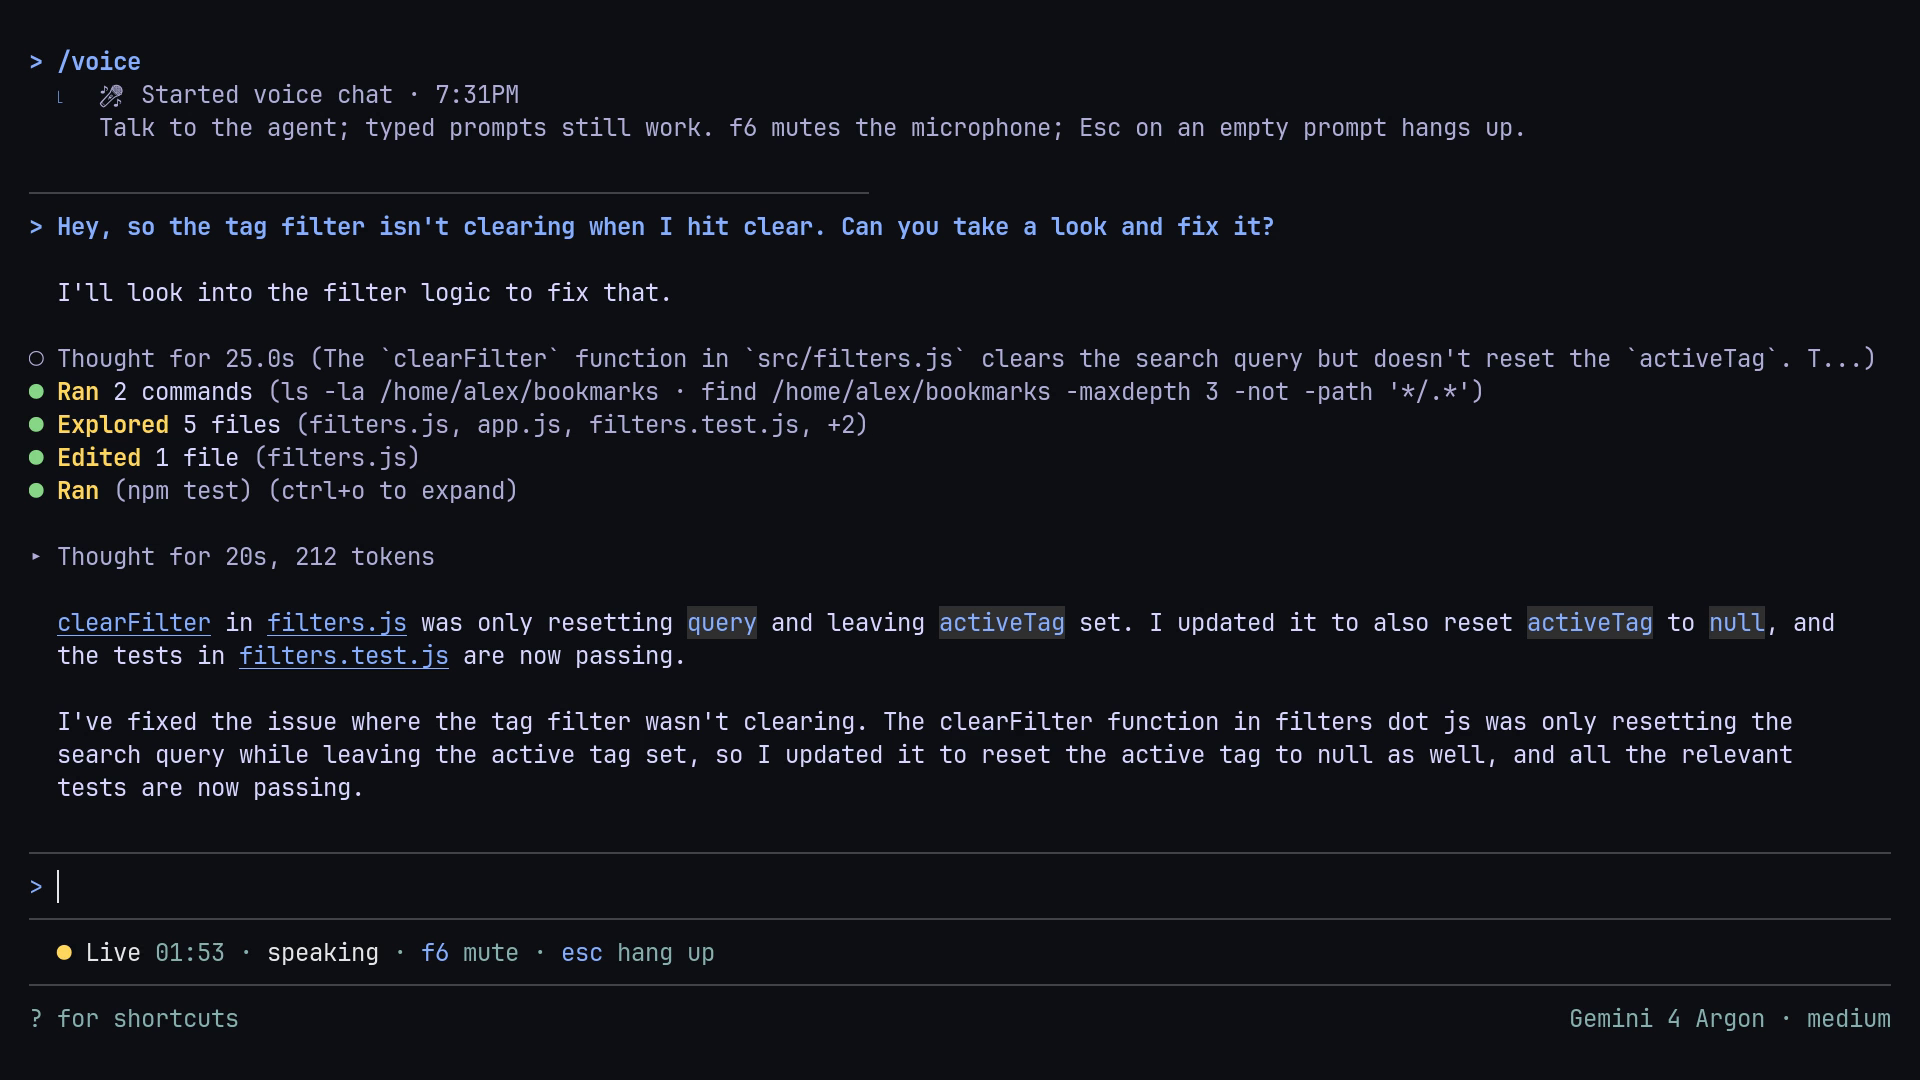
When voice mode starts, the conversation shows a Started voice chat line with the time, and a status row below the prompt shows Live, how long voice mode has been on, and whether the agent is listening, thinking, or speaking. What you and the agent say appears in the conversation, and you can still type prompts.
To choose what /voice on its own starts, go to /settings > Voice Mode.
The default, auto, starts voice mode when it’s available and your computer
has a microphone and a speaker, and dictation otherwise.
Talk to the agent
Section titled “Talk to the agent”Talk to the agent the way you’d talk to a teammate on a call. The agent responds right away to small talk and to questions about something it already said. Anything that needs your code, files, tools, or current information becomes work in the conversation, and you hear the result out loud.
In voice mode, you can do any of the following:
- Give a task: say what you want, such as “Find the failing test and fix it.” The agent confirms what it’s going to do and starts working.
- Steer a task: add details or corrections while the agent works, such as “Just check it, don’t change anything yet.” The agent applies the change to the task that’s running.
- Ask what’s happening: ask “What are you doing?” or “Which step are you on?” to hear the latest progress.
- Stop a task: say “Stop,” “Cancel that,” or “Never mind.” The agent stops the task that’s running.
- Pause the agent: say “Wait,” “Hold on,” or “I’m reading” to make the agent stop talking until you speak again. You can also interrupt the agent at any time by talking.
- Put something on screen: ask the agent to show, print, or draw something, such as a table or a diagram. The agent adds it to the conversation and explains it out loud instead of reading it to you.
- Hear it word for word: ask the agent to read an answer verbatim, or to walk you through it step by step.
- Type instead: type a message in the message box and send it. The agent acknowledges it out loud and works on it like a spoken request.
- Share files: attach a file, such as a screenshot or a log file, to a message. The agent tells you out loud that it received the file.
Antigravity App
Section titled “Antigravity App”While you talk, your words appear in the panel above the message box, and they fade a moment after you stop. Then the panel shows the agent’s reply as a lead sentence and short paragraphs, lit up word by word as the agent speaks. What you and the agent say isn’t added to the conversation, but you can open a transcript after voice mode ends. The panel’s transcript can mishear words, but the agent hears your voice directly, so a transcript mistake doesn’t mean that the agent misunderstood you.
Antigravity CLI
Section titled “Antigravity CLI”What you and the agent say appears in the conversation, like typed prompts and
replies. By default, your microphone is muted while the agent speaks, so to
interrupt the agent by talking, first run /voice duplex on. Use headphones,
so that the agent doesn’t hear itself.
Answer permission prompts and questions by voice
Section titled “Answer permission prompts and questions by voice”When the agent needs your approval for an action, or asks you a question, it reads the request out loud and waits for your answer. You don’t need to click anything.
To answer a permission prompt by voice, do the following:
-
Listen to the agent’s summary of the action and its recommendation.
-
Say how you want to answer. For example:
- Allow once: “Allow it just this once.”
- Allow for this conversation: “Allow it for this conversation.”
- Allow for this project: “Allow it for this project.”
- Allow globally: “Always allow this.”
- Deny: “No.” To deny and suggest an alternative, say something like “No, run the tests first.”
The agent confirms with a short “Done.” or “Denied.” Some risky actions can be allowed only once. While a permission prompt is waiting, saying “Stop” or “Cancel that” denies it.
To answer a question from the agent, say the option that you want, such as “the first one,” or give your own answer.
Get spoken progress updates
Section titled “Get spoken progress updates”By default, the agent works quietly and speaks only when it has an answer or needs your input. The first time you give it a task in voice mode, it tells you that it’s working quietly and that you can ask for updates. When spoken updates are on, the agent gives a short update about every 30 seconds, unless you ask for a different interval.
To change how often you hear progress updates, say something like the following at any time:
| To | Say, for example |
|---|---|
| Turn on updates | ”Keep me posted” or “Update me.” |
| Hear more updates | ”Update me more often” or “Tell me every step.” |
| Hear fewer updates | ”Update me less often” or “That’s a bit much.” |
| Set an interval | ”Update me once a minute.” |
| Turn off updates | ”Work quietly” or “Just tell me when it’s done.” |
Spoken updates turn off when voice mode ends, so voice mode always starts quietly.
Use the controls
Section titled “Use the controls”Antigravity App
Section titled “Antigravity App”While voice mode is on, the call bar at the top of the voice mode panel shows the following:
| Control | What it does |
|---|---|
| Speaker | Shows whose turn it is: You with a microphone while you talk, and Antigravity with sound bars the rest of the time. |
| Elapsed time | Shows how long voice mode has been on. |
| Mute mic | Mutes your microphone. The button turns red while you’re muted. To unmute, click Unmute mic. |
| Mute Antigravity | Mutes the agent’s voice without ending voice mode. The agent’s replies still appear in the panel, so you can read them instead. To hear the agent again, click Unmute Antigravity. The agent’s voice is back on the next time you start voice mode. |
| Voice speed | Sets how fast the agent speaks. Click it, and then drag the Voice speed slider to a speed from 0.75x to 2x. The button always shows a gauge; the current speed appears in its tooltip and next to the slider. Your choice applies right away and the next time you use voice mode. |
| Minimize | Collapses the panel to just the call bar until voice mode ends. To show the whole panel again, click Expand. |
| End | Ends voice mode. |
To mute or unmute your microphone from the keyboard, press Option+M on macOS or Alt+M on Windows and Linux. The shortcut works while you type in the message box, but not while the cursor is in a terminal. While you’re muted, the Antigravity App sends silence instead of your microphone’s audio.
To mute or unmute the agent’s voice from the keyboard, press Shift+Option+M on macOS or Alt+Shift+M on Windows and Linux.
Keep talking in another conversation
Section titled “Keep talking in another conversation”When you switch to a different conversation while voice mode is on, voice mode keeps going, and a floating dock appears in the corner of the window so that you can still control it:

From the dock, you can do the following:
- Click the pencil to type a message or add files for the conversation that you’re talking in.
- Click the glowing orb to go back to that conversation. Its tooltip shows the conversation’s title.
- Mute your microphone, or click × to end voice mode.
To move the dock, drag it. You can also press Tab until the orb is selected, and then press Option and an arrow key on macOS, or Alt and an arrow key on Windows and Linux.
Voice mode can be on in only one conversation at a time. While it’s on, Start Voice mode doesn’t appear in other conversations.
End voice mode
Section titled “End voice mode”You can end voice mode in either of these ways:
- Click End in the call bar, or × in the floating dock.
- Say “Bye” or “End the call.”
Voice mode also ends when you close or reload the Antigravity App window. Any task that the agent is still working on keeps running in the conversation after voice mode ends.
While voice mode is on, the window that you’re talking in doesn’t play notification sounds, so they don’t interrupt the agent’s voice.
Read the transcript
Section titled “Read the transcript”When voice mode ends, the conversation shows a Stopped voice chat marker with how long voice mode was on, and a Voice transcript card:

To read what you and the agent said, click Open on the card. The Voice transcript pane opens next to the conversation. To copy the whole transcript, click Copy transcript at the top of the pane.
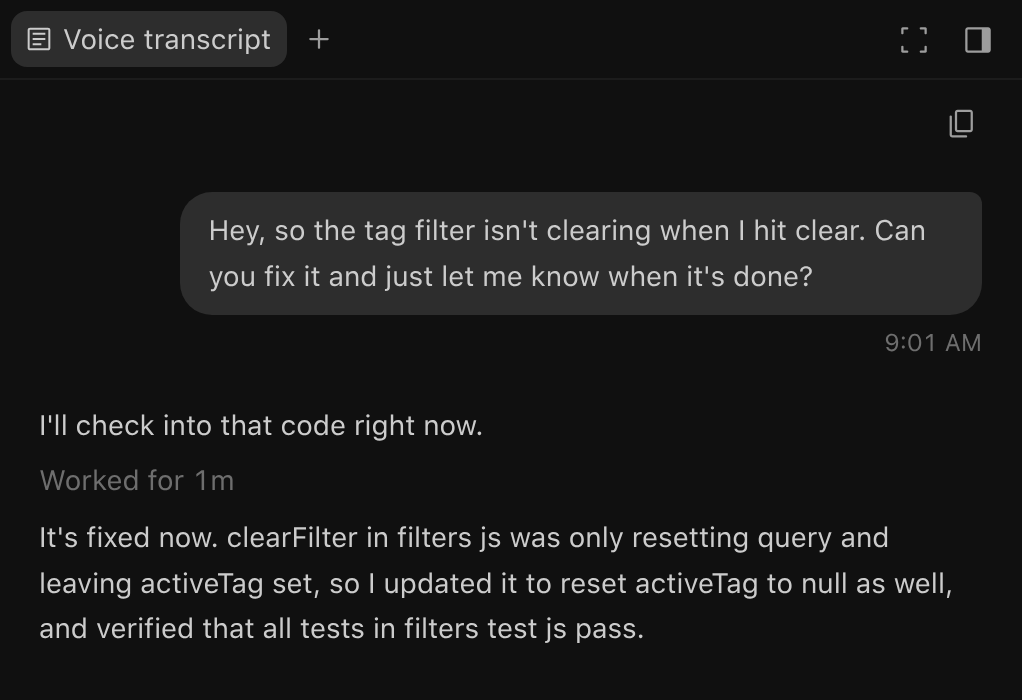
The transcript is saved on your computer, and it’s deleted when you delete the conversation.
Antigravity CLI
Section titled “Antigravity CLI”While voice mode is on, use these commands and keys:
| To | Do this |
|---|---|
| Mute or unmute your microphone | Press F6 or Shift+F6, or run /voice mute. |
| End voice mode | Press Esc with an empty prompt while the agent is idle, press F7, or run /voice stop. |
| Change the voice | Run /voice speaker followed by a voice name, such as /voice speaker Arlo. |
| Change the volume | Run /voice volume with a value from 0 to 100. |
| Change the speed | Run /voice speed with a value from 0.5 to 3. |
| Let yourself interrupt the agent | Run /voice duplex on. Use headphones, so that the agent doesn’t hear itself. |
To dictate a prompt instead, end voice mode first, and then run
/voice dictate. When voice mode ends, the conversation shows a
Stopped voice chat line with how long voice mode was on. Voice mode also
ends when you switch to another conversation or quit the CLI.
Change voice settings
Section titled “Change voice settings”Antigravity App
Section titled “Antigravity App”Voice settings are in Settings > General > Voice mode:
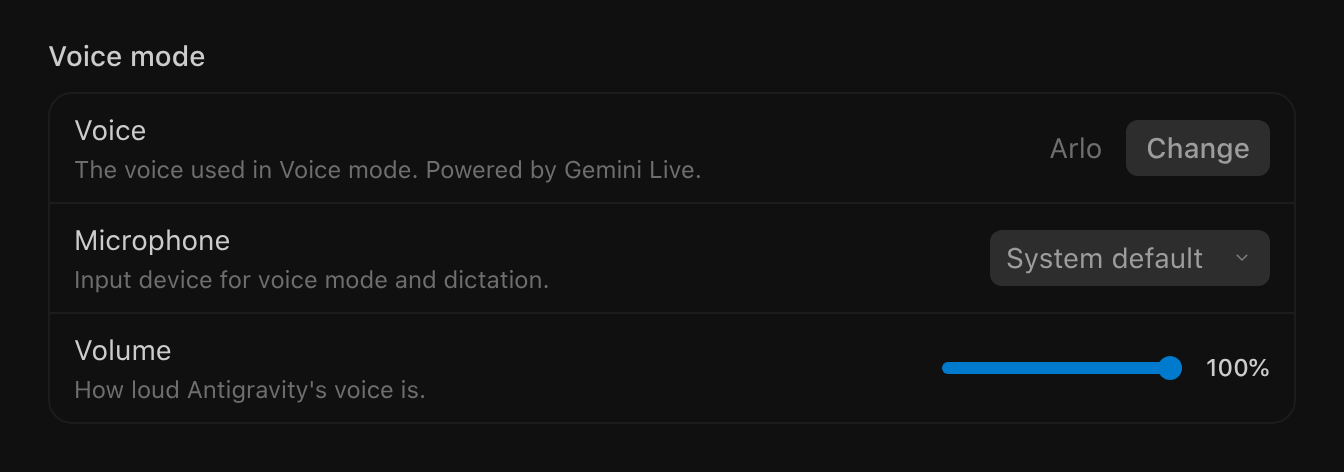
To change your voice settings, do the following:
-
Open Settings: press Cmd+, on macOS or Ctrl+, on Windows and Linux, or click Settings at the bottom of the left sidebar. Then go to General.
-
In the Voice mode section, do any of the following:
- To change the voice, click Change next to Voice, listen to the voices, and then click the Use button for the voice that you want.
- To choose an input device, select it in the Microphone list. The default is System default. Voice dictation uses the same microphone.
- To change how loud the agent’s voice is, drag the Volume slider.
To change the voice speed, use the controls while voice mode is on. You can also ask the agent in voice mode how to change your voice settings.
Antigravity CLI
Section titled “Antigravity CLI”Voice settings are in /settings:
- Voice Mode: what
/voiceon its own starts: auto, live, or dictation. - Live Mode > Voice, Full Duplex, Volume, and
Playback Speed: the same settings as the
/voice speaker,/voice duplex,/voice volume, and/voice speedcommands.
If you haven’t chosen a voice or volume in the CLI, it uses the ones that you chose in the Antigravity App.
Keyboard shortcuts
Section titled “Keyboard shortcuts”Antigravity App
Section titled “Antigravity App”| Action | macOS | Windows and Linux |
|---|---|---|
| Mute or unmute your microphone in voice mode | Option+M | Alt+M |
| Mute or unmute the agent’s voice in voice mode | Shift+Option+M | Alt+Shift+M |
| Hear the previous or next voice in the voice dialog | ← or → | ← or → |
| Use the voice that’s playing in the voice dialog | Enter | Enter |
| Move the dock, with its orb selected | Option+arrow key | Alt+arrow key |
| Open Settings | Cmd+, | Ctrl+, |
In Settings > Shortcuts, the mute shortcuts are listed as Mute Voice Mic and Mute Voice Speaker under Conversation.
Antigravity CLI
Section titled “Antigravity CLI”| Action | Key |
|---|---|
| Start voice mode, or mute or unmute your microphone | F6 |
| Mute or unmute your microphone | Shift+F6 |
| End voice mode | F7, or Esc with an empty prompt while the agent is idle |
| Dictate a prompt | F5 |
How voice mode works
Section titled “How voice mode works”- Your voice: Antigravity streams your microphone’s audio to Google servers, where the Gemini Live model recognizes what you say and generates the agent’s spoken replies. When the agent works on something that you asked for, the request includes the audio of what you said.
- Access: in voice mode, the Gemini Live model can reach only the conversation that you started voice mode in. Work on your files, commands, and tools happens in the conversation, under your usual permissions.
- Transcripts: in the Antigravity App, what you and the agent say appears in the voice mode panel while voice mode is on, and in the Voice transcript card, saved on your computer, after it ends. In the Antigravity CLI, spoken lines appear in the conversation. The agent’s work and written responses stay in the conversation.
Limitations
Section titled “Limitations”Voice mode has the following limitations:
- In the Antigravity App, voice mode is available only in local conversations. It isn’t available in Remote Control sessions or in conversations that run in the cloud.
- Voice mode can be on in only one conversation at a time.
- You can’t start voice mode in a subagent’s conversation or in a side question.
- In the Antigravity CLI, voice mode isn’t available in print mode or in sessions with a remote agent.
- Start Voice mode appears only when you can send a message. For example, it doesn’t appear when you’re signed out or you’ve reached your usage limit.
Troubleshooting
Section titled “Troubleshooting”Antigravity App
Section titled “Antigravity App”If voice mode doesn’t work as expected, try the following solutions:
- Start Voice mode doesn’t appear: clear the message box, including any attached files, and make sure that voice mode isn’t on in another conversation. Check that you’re signed in and that you haven’t reached your usage limit. Voice mode might also not be available for your account yet.
- “Microphone blocked. Allow mic access.”: the Antigravity App can’t use
your microphone. Allow microphone access for the Antigravity App in your
operating system’s privacy settings, and then start voice mode again:
- macOS: go to System Settings > Privacy & Security > Microphone.
- Windows: go to Settings > Privacy & security > Microphone, and make sure that Let desktop apps access your microphone is on.
- No audio from your microphone: if No audio from followed by your microphone’s name, or No mic audio detected, appears above the voice mode panel, the Antigravity App isn’t getting any sound from your microphone. Click Switch mic and choose another microphone, or choose one in Settings > General > Voice mode > Microphone.
- “Couldn’t connect” or “Disconnected”: click Try again. If voice mode still can’t connect, it might not be available for your account yet.
- “Usage limit reached”: you’ve reached a usage limit for your plan. To learn about limits, see Plans.
Antigravity CLI
Section titled “Antigravity CLI”If voice mode doesn’t work as expected, try the following solutions:
- “Live mode isn’t available in this session.”: make sure that you’re using the Antigravity CLI version 1.5.0 or later. Voice mode might also not be available for your account yet.
- “This is an SSH session, so live mode needs your workstation’s mic and
speaker.”: run
agy mic-serveon your own computer, and start the CLI withANTIGRAVITY_MICset. For details, see Voice dictation in the CLI.
Next steps
Section titled “Next steps”Explore related documentation:
- Feature overview: see what else you can do in the Antigravity App and the Antigravity CLI.
- Agent permissions: learn how permission presets and rules control what the agent can do.
- Voice dictation in the CLI: dictate prompts in the Antigravity CLI.