

Authenticate
Section titled “Authenticate”Antigravity uses a unified authentication layer across Antigravity app, Antigravity CLI, Antigravity for IDEs, and the Antigravity SDK. Signing in on one local surface shares your credentials across your local environment.
Sign in by surface
Section titled “Sign in by surface”Select your surface below to authenticate your account, switch credentials, or configure headless and enterprise environments.
Personal Google Account
Section titled “Personal Google Account”- Launch Antigravity app.
- Click Sign in to open the browser authentication flow.
- Complete the browser-based OAuth flow using your personal Google Account (Free, Pro, or Ultra plan).
- Once authenticated, the browser redirects back to Antigravity app and initializes your workspace.
Gemini Enterprise & Google Cloud Account
Section titled “Gemini Enterprise & Google Cloud Account”Google Antigravity uses a single sign-on (SSO) flow for corporate business accounts and automatically detects your assigned Gemini Enterprise license tier:
- Start Antigravity app and select Sign in to open the browser authentication flow.
- Choose Business account (subject to the Google Cloud Terms of Service).
- Select Continue with Google Cloud (or select Advanced WIF Configuration and enter your organization’s WIF Configuration String for Bring Your Own Identity / Workforce Identity Federation).
- Complete authentication in your browser.
- Once authenticated, the License Selector displays your assigned licenses.
- Confirm the project linked to your license and select it. Alternatively, select Other to self-assign a license by entering your Google Cloud Project ID and selecting a location (
global,us, oreu).
Application Default Credentials (ADC)
Section titled “Application Default Credentials (ADC)”For automated or headless workflows, you can authenticate Antigravity app using Google Cloud Application Default Credentials:
- Generate local Application Default Credentials for your project:
gcloud auth application-default login --project {GCP_PROJECT} - Enable ADC in Antigravity app using either option:
- Launch from a terminal with
export AGY_ADC_AUTH=true. - Or enable the
enableAdcuser setting in~/.gemini/config/config.json:{ "userSettings": { "enableAdc": true } }
- Launch from a terminal with
Antigravity CLI (agy) uses secure credentials and token profiles to communicate with the shared agent harness.
Local silent keyring sign-in
Section titled “Local silent keyring sign-in”When launching agy on your local machine, the CLI attempts to access your operating system’s native secure keyring (such as Apple Keychain, Linux Secret Service/dbus, or Windows Credential Manager). If a valid token profile is found, the CLI authenticates your session silently without opening a browser.
If no saved session is found:
- The CLI automatically launches your local default web browser.
- Sign in using your approved account credentials (personal Google Account, or choose Business account → Continue with Google Cloud / Advanced WIF Configuration for Gemini Enterprise).
Remote SSH OAuth flow
Section titled “Remote SSH OAuth flow”When running over SSH, the CLI detects the remote connection environment. Because it cannot launch a local web browser, the CLI initiates a manual URL loop:
- Launch
agyin your remote terminal session. - The CLI detects the SSH environment and prints a unique, secure authorization URL.
- Copy this URL and paste it into a web browser on your local machine.
- Sign in with your approved credentials and complete the authentication.
- The browser displays a unique alphanumeric authorization code.
- Copy this code, return to your remote SSH terminal, and paste it into the prompt.
Using a Gemini API key
Section titled “Using a Gemini API key”Run Antigravity CLI with your own Gemini API key instead of a signed-in Google account. Model requests go directly to the Gemini API, and the CLI never establishes an account session. This suits headless and CI runs, where no browser is available to complete a sign-in. Create a key in Google AI Studio.
To use a Gemini API key, you have to set a provider and an environment variable with the API key. Only setting a GEMINI_API_KEY environment variable on its own has no effect.
Enable the Gemini API key
Section titled “Enable the Gemini API key”-
Set
modelProvidertogeminiin~/.gemini/antigravity-cli/settings.json:{ "modelProvider": "gemini" } -
Export your key as
GEMINI_API_KEY:export GEMINI_API_KEY="your-api-key"This applies to the current shell only. Add the same line to your shell profile, such as
~/.zshrcor~/.bashrc, to persist it across sessions. -
Start the CLI:
agy
The CLI skips the sign-in screen and opens the main interface directly. The header shows Gemini API key instead of your account email:
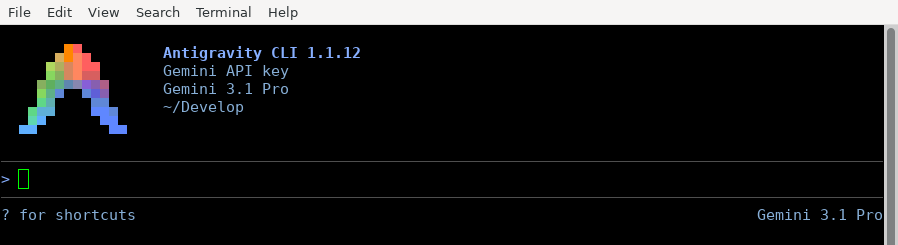
Note: When you use the authentication with a
GEMINI_API_KEY,/logouthas no effect because there is no stored session to clear.
Point the CLI to a custom endpoint
Section titled “Point the CLI to a custom endpoint”To send model requests to a different Gemini-compatible endpoint, set the GOOGLE_GEMINI_BASE_URL environment variable:
export GOOGLE_GEMINI_BASE_URL="https://your-endpoint.example.com"Revert to default authentication
Section titled “Revert to default authentication”If you want to revert back to using the default account based authentication:
- Remove
modelProviderfrom~/.gemini/antigravity-cli/settings.json. - Restart the CLI to sign in to your account.
Note: The CLI cannot start if you unset the
GEMINI_API_KEYenvironment variable, but still have themodelProviderset togemini.
Troubleshooting API key authentication
Section titled “Troubleshooting API key authentication”| Symptom | Cause | Resolution |
|---|---|---|
The CLI exits at startup reporting that GEMINI_API_KEY is not set | modelProvider is gemini but the key is missing from the environment | Export GEMINI_API_KEY, or remove modelProvider to use the default authentication |
| The CLI signs in normally and ignores the setting | modelProvider holds an unrecognized value | gemini is the only accepted value. Check the spelling and restart the CLI |
A key set through GOOGLE_API_KEY or a .env file has no effect | The CLI reads the credential only from GEMINI_API_KEY in the environment, and does not load .env files | Export GEMINI_API_KEY in your shell or shell profile |
| Requests fail mid-session with a generic model error | The key is invalid, revoked, or lacks access to the requested model | Verify the key in Google AI Studio. The CLI checks only that the key is non-empty at startup, so an unusable key only surfaces on the first conversation |
Application Default Credentials (ADC)
Section titled “Application Default Credentials (ADC)”For headless enterprise environments and automated terminal workflows, Antigravity CLI supports Google Cloud Application Default Credentials (ADC):
- Generate local ADC credentials for your project:
gcloud auth application-default login --project {GCP_PROJECT} - Enable ADC in the CLI by setting
AGY_ADC_AUTH=true(and optionallyGOOGLE_CLOUD_QUOTA_PROJECTandGOOGLE_CLOUD_LOCATION):export AGY_ADC_AUTH=true - To sign out of ADC on the CLI, unset the environment variable (
unset AGY_ADC_AUTH) and restart your terminal session.
Managing your session (logging out)
Section titled “Managing your session (logging out)”Terminating your session clears active credentials and local cache directories. To disconnect your account and purge saved authentication profiles from your operating system’s keyring, run the following command in the CLI prompt box:
/logoutInstallation flags
Section titled “Installation flags”When executing the CLI installation scripts (see Quickstart), you can append the following customization flags:
--skip-aliases: Bypasses shell profile alias purging (prevents the script from purging or updating legacyagyorantigravityshell aliases).--skip-path: Bypasses shell profilePATHappending (prevents the script from modifying your shell profile’s dynamic environment variables).
Unified sign-in across IDE extensions
Section titled “Unified sign-in across IDE extensions”Antigravity uses a unified authentication system across all IDE extensions (Visual Studio Code, IntelliJ-based IDEs, Visual Studio, Zed, and Xcode), the Antigravity CLI, and Antigravity app.
- Individual developers: Click the Antigravity icon in your editor’s activity bar or tool window (or select Antigravity and use the … button under Xcode > Settings > Intelligence in Xcode) and click Sign In to complete authentication in your default web browser.
- Enterprise teams & organizations: Click Sign In and select Sign in with Gemini Enterprise (or choose Business account → Continue with Google Cloud / BYOID), then select your target Google Cloud Project and Region (
global,us, oreu). Gemini Enterprise authentication for JetBrains IDEs, Zed, and Xcode is currently in Preview.
Agent configuration (auth.type)
Section titled “Agent configuration (auth.type)”In editors that configure external agents via JSON settings (IntelliJ-based IDEs, Zed, and Xcode), configure your authentication method using the following settings:
Google Accounts
For individual Google AI subscription plans (including Free, Pro, and Ultra):
{
  "auth": {
    "type": "oauth-personal"
  }
}Programmatic authentication
Section titled “Programmatic authentication”The Google Antigravity SDK (google-antigravity) supports the following authentication methods for Python 3.10+ applications (see SDK Overview):
- Gemini API Key: Set your Gemini API key in the environment before initializing
Agent:export GEMINI_API_KEY="your_api_key_here" - Gemini Enterprise (Google Cloud / Vertex AI): Set
vertex=TrueinLocalAgentConfigalongside your GCPprojectandlocationto route requests through the Gemini Enterprise API (aiplatform.googleapis.com):
Or configure Gemini Enterprise via environment variables and Application Default Credentials:from google.antigravity import Agent, LocalAgentConfig config = LocalAgentConfig( vertex=True, project="your-gcp-project", location="us-central1", )export GOOGLE_GENAI_USE_VERTEXAI=True export GOOGLE_CLOUD_PROJECT="your-gcp-project" export GOOGLE_CLOUD_LOCATION="us-central1" gcloud auth application-default login - Local models (offline, no API key required): Run agents directly on-device using
LiteRTAgentConfigor connect to a local OpenAI-compatible server (Ollama,LM Studio,vLLM) usingLocalOpenAIAgentConfig. See Local models.