

Installation & auth
Section titled “Installation & auth”Install Antigravity CLI, configure enterprise requirements, and establish secure authenticated sessions.
Installation
Section titled “Installation”Antigravity CLI runs natively on macOS, Linux, and Windows. Use the platform-specific scripts below to install or upgrade the binary on your system.
macOS and Linux
Section titled “macOS and Linux”Execute the native installer script to download and install the executable to ~/.local/bin/agy:
curl -fsSL https://antigravity.google/cli/install.sh | bashWindows
Section titled “Windows”The installation script registers the agy binary to your local user directory:
C:\Users\<username>\AppData\Local\agy\bin (where <username> represents your active Windows user profile).
PowerShell: Open PowerShell and execute the following installation script:
irm https://antigravity.google/cli/install.ps1 | iexCMD: Open a standard Command Prompt and execute:
curl -fsSL https://antigravity.google/cli/install.cmd -o install.cmd && install.cmd && del install.cmdInstallation flags
Section titled “Installation flags”When executing the installation scripts, you can append the following customization flags:
--skip-aliases: Bypasses shell profile alias purging (prevents the script from purging or updating legacyagyorantigravityshell aliases).--skip-path: Bypasses shell profilePATHappending (prevents the script from modifying your shell profile’s dynamic environment variables).
Authentication workflows
Section titled “Authentication workflows”Antigravity CLI uses secure credentials and token profiles to communicate with the shared agent harness.
Local silent keyring sign-in
Section titled “Local silent keyring sign-in”When launching agy on your local machine, the CLI attempts to access your operating system’s native secure keyring (such as Apple Keychain, Linux Secret Service/dbus, or Windows Credential Manager). If a valid token profile is found, the CLI authenticates your session silently without opening a browser.
If no saved session is found:
- The CLI automatically launches your local default web browser.
- Sign in using your approved account credentials.
Remote SSH OAuth flow
Section titled “Remote SSH OAuth flow”When running over SSH, the CLI detects the remote connection environment. Because it cannot launch a local web browser, the CLI initiates a manual URL loop:
- Launch
agyin your remote terminal session. - The CLI detects the SSH environment and prints a unique, secure authorization URL.
- Copy this URL and paste it into a web browser on your local machine.
- Sign in with your approved credentials and complete the authentication.
- The browser displays a unique alphanumeric authorization code.
- Copy this code, return to your remote SSH terminal, and paste it into the prompt.
Using a Gemini API key
Section titled “Using a Gemini API key”Run Antigravity CLI with your own Gemini API key instead of a signed-in Google account. Model requests go directly to the Gemini API, and the CLI never establishes an account session. This suits headless and CI runs, where no browser is available to complete a sign-in. Create a key in Google AI Studio.
To use a Gemini API key, you have to set a provider and an environment variable with the API key. Only setting a GEMINI_API_KEY environment variable on its own has no effect.
Enable the Gemini API key
Section titled “Enable the Gemini API key”-
Set
modelProvidertogeminiin~/.gemini/antigravity-cli/settings.json:{ "modelProvider": "gemini" } -
Export your key as
GEMINI_API_KEY:export GEMINI_API_KEY="your-api-key"This applies to the current shell only. Add the same line to your shell profile, such as
~/.zshrcor~/.bashrc, to persist it across sessions. -
Start the CLI:
agy
The CLI skips the sign-in screen and opens the main interface directly. The header shows Gemini API key instead of your account email:
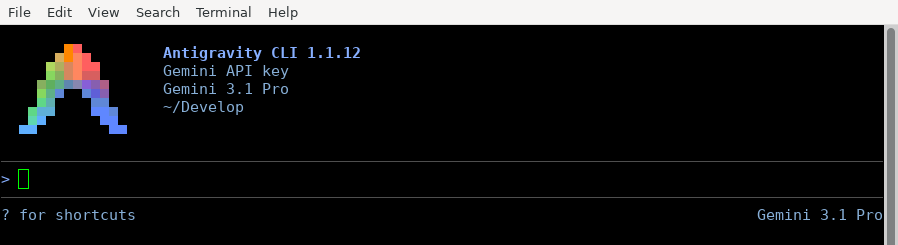
Note: When you use the authentication with a
GEMINI_API_KEY,/logouthas no effect because there is no stored session to clear.
Point the CLI to a custom endpoint
Section titled “Point the CLI to a custom endpoint”To send model requests to a different Gemini-compatible endpoint, set the GOOGLE_GEMINI_BASE_URL environment variable:
export GOOGLE_GEMINI_BASE_URL="https://your-endpoint.example.com"Revert to default authentication
Section titled “Revert to default authentication”If you want to revert back to using the default account based authentication:
- Remove
modelProviderfrom~/.gemini/antigravity-cli/settings.json. - Restart the CLI to sign in to your account.
Note: The CLI cannot start if you unset the
GEMINI_API_KEYenvironment variable, but still have themodelProviderset togemini.
Troubleshooting
Section titled “Troubleshooting”| Symptom | Cause | Resolution |
|---|---|---|
The CLI exits at startup reporting that GEMINI_API_KEY is not set |
modelProvider is gemini but the key is missing from the environment |
Export GEMINI_API_KEY, or remove modelProvider to use the default authentication |
| The CLI signs in normally and ignores the setting | modelProvider holds an unrecognized value |
gemini is the only accepted value. Check the spelling and restart the CLI |
A key set through GOOGLE_API_KEY or a .env file has no effect |
The CLI reads the credential only from GEMINI_API_KEY in the environment, and does not load .env files |
Export GEMINI_API_KEY in your shell or shell profile |
| Requests fail mid-session with a generic model error | The key is invalid, revoked, or lacks access to the requested model | Verify the key in Google AI Studio. The CLI checks only that the key is non-empty at startup, so an unusable key only surfaces on the first conversation |
Managing your session
Section titled “Managing your session”Terminating your session clears active credentials and local cache directories.
Logging out
Section titled “Logging out”To disconnect your account and purge saved authentication profiles from your operating system’s keyring, run the following command in the CLI prompt box:
/logoutNext steps
Section titled “Next steps”Once you complete installation and authentication, start interacting with your local agent:
- Tutorial: Create and run a basic Python project with an agent.
- Prompting & Interaction: Explore multiline text editing, interrupt commands, and terminal media pasting.
- Permissions & Sandbox: Configure secure filesystem directories and command limits.